試験の準備方法-素敵なC_S4CPB_2602認定資格試験-認定するC_S4CPB_2602受験対策書
Wiki Article
もしあなたはIT業種でもっと勉強になりたいなら、Fast2testを選んだ方が良いです。Fast2testのSAPのC_S4CPB_2602試験トレーニング資料は豊富な経験を持っている専門家が長年の研究を通じて開発されたものです。それは正確性が高くて、カバー率も広いです。Fast2testのSAPのC_S4CPB_2602試験トレーニング資料を手に入れたら、成功に導く鍵を手に入れるのに等しいです。
なぜみんなが順調にSAPのC_S4CPB_2602試験に合格できることに対する好奇心がありますか。SAPのC_S4CPB_2602試験に合格したいんですか。実は、彼らが試験に合格したコツは我々Fast2testの提供するSAPのC_S4CPB_2602試験ソフトを利用したんです。豊富の問題集、専門的な研究と購入の後の一年間の無料更新、ソフトで復習して、自分の能力の高めを感じられます。SAPのC_S4CPB_2602試験に合格することができます。
更新するC_S4CPB_2602認定資格 & 合格スムーズC_S4CPB_2602受験対策書 | 効率的なC_S4CPB_2602試験情報
変化する地域に対応するには、問題を解決する効率を改善する必要があります。これは、試験に対処するだけでなく、多くの側面を反映しています。 C_S4CPB_2602実践教材は、あなたがそれを実現するのに役立ちます。これらの時間に敏感な試験の受験者にとって、重要なニュースで構成される高効率のC_S4CPB_2602実際のテストは、最高の助けになります。定期的にそれらを練習することによってのみ、あなたはあなたに明らかな進歩が起こったのを見るでしょう。それに、C_S4CPB_2602練習教材の利益を待つのではなく、支払い後すぐにダウンロードできるので、今すぐ成功への旅を始めましょう。
SAP Certified - Implementation Consultant - SAP S/4HANA Cloud Public Edition (C_S4CPB_2602) 認定 C_S4CPB_2602 試験問題 (Q14-Q19):
質問 # 14
SIMULATION
Create a Custom Launchpad Space and Page
Business Scenario
You are building a custom business role that will be assigned to all employees in the organization. The business role and its corresponding Launchpad Space and Page need to include the apps that have been granted through the business catalogs assigned to the business role to ensure employees have an easy time finding the relevant applications.
Note: In the task below, always replace ###### with the last 6 digits of your group number.
Note:
Make sure to use the EXACT names/values/spaces as they are listed in the task.
Even forgetting a space or a number will cause the validation of the task to fail and be marked as incorrect.
Task:
Assign the business role to your user and save. Then refresh the browser and navigate home to verify the new Launchpad Space and tiles are visible.
正解:
解説:
See Explanation below for all solution
Explanation:
Objective
The purpose of this task is to assign the newly created custom all-employee business role to your own business user, save the assignment, refresh the browser, and then verify that the new Launchpad Space and its tiles are visible on the homepage.
This is the final verification step for the all-employee role and launchpad setup.
Business Scenario Explanation
In the previous tasks, you created and configured:
a new custom business role for all employees,
the required business catalogs,
a custom launchpad space,
a custom launchpad page,
and the employee self-service tiles:
Manage My Timesheet
Concur Travel Expense
However, even if all of that is configured correctly, you still will not see the new page and tiles on your homepage until the custom role is assigned to your own business user.
This task connects the configuration to your user and verifies the final end-user result.
Important Notes
Always replace ###### with the last 6 digits of your group number.
Use the exact business role ID.
Save the user after adding the role.
Refresh the browser after saving.
Then navigate back to Home and confirm the space/page/tiles are visible.
Required Business Role
Assign the custom all-employee role created earlier:
Business Role ID: Z_EMPLOYEES_ALL_######
Business Role Description: All Employee Role ######
Example
If your suffix is 000013, the role is:
Z_EMPLOYEES_ALL_000013
Detailed Step-by-Step Procedure
Step 1: Open the app "Maintain Business Users"
From the SAP S/4HANA Cloud launchpad:
Log in to SAP S/4HANA Cloud.
Search for:
Maintain Business Users
Open the app.
Explanation:
This app is used to assign business roles to users.
The launchpad space and tiles will only become visible after the custom role is assigned to your own user.
Step 2: Search for your own business user
In Maintain Business Users:
Enter your own user name or business user ID in the search field.
Click Go.
Explanation:
You must assign the role to your own user because you are the one who will verify the launchpad result on the homepage.
Step 3: Open your user record
From the search results:
Click your user entry.
Open the user details page.
Explanation:
This opens the maintenance page where assigned business roles can be reviewed and changed.
Step 4: Switch to Edit mode
On the business user page:
Click Edit
Explanation:
Without edit mode, the role assignment list is display-only.
Step 5: Open the "Assigned Business Roles" tab
Inside the user record:
Click:
Assigned Business Roles
Explanation:
This tab contains the list of all business roles currently assigned to your user and is the correct place to add the all-employee role.
Step 6: Click Add
In the Assigned Business Roles section:
Click Add
This opens the popup:
Add Business Roles
Explanation:
This popup allows you to search for and assign the custom all-employee role.
Step 7: Search for the custom all-employee role
In the Add Business Roles popup:
In the business role search field, enter:
Z_EMPLOYEES_ALL_######
Click Go
Select the role:
Z_EMPLOYEES_ALL_######
All Employee Role ######
Example
If your suffix is 000013, search for:
Z_EMPLOYEES_ALL_000013
Explanation:
This is the custom role created in the earlier launchpad/employee-role tasks.
It contains the launchpad space, catalogs, and page content that must now become visible to your user.
Step 8: Add the role
After selecting the role:
Click OK or Apply
Explanation:
This adds the role to your user in draft mode.
Step 9: Save the business user
Back on the business user page:
Click Save
Explanation:
This is a mandatory step.
Without saving, the role assignment is not finalized, and the new launchpad content will not appear for your user.
Step 10: Confirm the role assignment
After saving, verify that your assigned roles list includes:
Z_EMPLOYEES_ALL_######
All Employee Role ######
Explanation:
This confirms that the role is now officially assigned to your user.
Step 11: Refresh the browser
After saving:
Refresh the browser completely
Explanation:
SAP launchpad content is often cached in the current session.
A browser refresh ensures the newly assigned role content is loaded.
Step 12: Navigate back to Home
After refreshing:
Return to Home
Explanation:
The role's launchpad space and page must be verified from the end-user homepage, not only from configuration apps.
Step 13: Open the page / launchpad tab
On the homepage, look for the custom page/tab that contains the employee content.
In your run, the visible page was:
General
Explanation:
The launchpad page created earlier was titled General, so that is the page you should open to verify the result.
Step 14: Verify the section title
On the page, confirm that you can see the section:
Self-Services
Explanation:
This was the section title created in the earlier page-content maintenance task.
Step 15: Verify the tiles
Under the Self-Services section, confirm that both tiles are visible:
Concur Travel Expense
Manage My Timesheet
Explanation:
These are the two required employee self-service tiles added to the page in the previous task.
Seeing both of them confirms that:
the catalogs were assigned correctly,
the launchpad page was maintained correctly,
the business role was assigned correctly,
and the browser refresh loaded the new content successfully.
Expected Result
After completing this task successfully:
your own user has the custom business role assigned,
the role is saved successfully,
after browser refresh the launchpad updates,
the homepage shows the new launchpad page,
the Self-Services section is visible,
and the tiles Concur Travel Expense and Manage My Timesheet are visible.
質問 # 15
SIMULATION
Create a Custom Launchpad Space and Page
Business Scenario
You are building a custom business role that will be assigned to all employees in the organization. The business role and its corresponding Launchpad Space and Page need to include the apps that have been granted through the business catalogs assigned to the business role to ensure employees have an easy time finding the relevant applications.
Note: In the task below, always replace ###### with the last 6 digits of your group number.
Note:
Make sure to use the EXACT names/values/spaces as they are listed in the task.
Even forgetting a space or a number will cause the validation of the task to fail and be marked as incorrect.
Task:
Assign the Launchpad Space to your custom business role. Edit the Launchpad Page to add the applications listed below as tiles (standard "preferred" square tile) with the Section Title: Self-Services.
Manage My Timesheet
Concur Travel Expense
正解:
解説:
See Explanation below for all solution
Explanation:
Objective
The purpose of this task is to complete the launchpad setup for the custom all-employee role by:
assigning the custom Launchpad Space to the business role,
editing the Launchpad Page,
creating a section titled Self-Services,
adding the required applications as standard preferred square tiles:
Manage My Timesheet
Concur Travel Expense
Business Scenario Explanation
In the earlier tasks, you created:
a custom all-employee business role,
the required business catalog assignments,
a custom launchpad space and page.
This task completes that setup by adding the actual application tiles that end users will see on the launchpad.
The goal is to make it easy for employees to find the relevant self-service applications without searching manually.
Important Notes
Always replace ###### with the last 6 digits of your group number.
Use the exact values listed in the task.
The section title must be exactly:
Self-Services
The two tiles must be:
Manage My Timesheet
Concur Travel Expense
Save after editing the page.
Prerequisites
Before doing this task, the following should already exist:
custom business role:
Z_EMPLOYEES_ALL_######
assigned business catalogs:
SAP_HCM_BC_EMP_PC
SAP_CON_BC_CTE_ESS_PC
custom launchpad space and page created for the role
page title and description:
General
Detailed Step-by-Step Procedure
Step 1: Open the app "Maintain Business Roles"
From the SAP S/4HANA Cloud launchpad:
Log in to SAP S/4HANA Cloud.
Search for:
Maintain Business Roles
Open the app.
Explanation:
This is the app where the custom all-employee role is maintained. The launchpad space assignment and page navigation are controlled from here.
Step 2: Open the custom all-employee business role
In Maintain Business Roles:
Search for your custom business role:
Z_EMPLOYEES_ALL_######
Open the role.
Example
If your suffix is 000013, the role is:
Z_EMPLOYEES_ALL_000013
Explanation:
You must work in the custom all-employee role because the launchpad space and page belong to this role.
Step 3: Open the Launchpad Spaces tab
Inside the role:
Click:
Launchpad Spaces
Explanation:
This tab shows which launchpad space is assigned to the role.
Step 4: Verify the Launchpad Space is assigned
Check that the assigned space exists.
In your execution, the assigned space followed this pattern:
Z_ALL_EMP_######
Explanation:
The task says to assign the launchpad space to the custom business role.
If the space already appears in the assigned list, then this part is already complete.
If the space is not listed:
Click Add
Create or assign the required custom space
Save the role
Step 5: Open the assigned Launchpad Space
In the assigned launchpad spaces list:
Click the arrow > at the far right of the space row.
Explanation:
This opens Space Details, where the page linked to the space can be accessed.
Step 6: Open the Pages tab
In Space Details:
Click:
Pages
Explanation:
A space can contain one or more pages.
This task requires you to edit the page content.
Step 7: Open the Launchpad Page
In the Pages list:
Open the page row by clicking the arrow > at the far right.
In your run, the page followed this pattern:
Z_ALL_EMP_######
Explanation:
This opens Page Details, where the page content can be edited.
Step 8: Open Page Content
Inside Page Details:
Click the tab:
Page Content
Explanation:
This is the area where sections and application tiles are maintained.
Step 9: Click Edit
On the Page Content screen:
Click Edit
Explanation:
The page must be in edit mode before you can create sections or add app tiles.
Step 10: Enter the section title
In the section title field, enter exactly:
Self-Services
Explanation:
This creates the section in which the required employee self-service app tiles will be placed.
The title must match the task exactly.
Step 11: Add the tile "Concur Travel Expense"
On the right side of the page content screen, in the list of apps derived from the assigned catalogs:
Find:
Concur Travel Expense
Click:
Add
Explanation:
This adds the Concur employee self-service app tile into the Self-Services section.
Step 12: Add the tile "Manage My Timesheet"
Still on the right side app list:
Find:
Manage My Timesheet
Click:
Add
Explanation:
This adds the timesheet app tile into the same Self-Services section.
Step 13: Verify both tiles are visible in the section
After adding both apps, confirm that the page content now shows:
Concur Travel Expense
Manage My Timesheet
under the section:
Self-Services
Explanation:
This confirms the tiles were placed correctly on the page.
Step 14: Save the page
Click:
Save
Explanation:
This finalizes the page changes.
If you do not save, the tiles and section will not be retained.
Step 15: Verify the role is assigned to your business user
To verify the page and tiles from the home screen, make sure the custom all-employee role is assigned to your own business user.
Open:
Maintain Business Users
Then:
Open your own user
Open Assigned Business Roles
Confirm the role is assigned:
Z_EMPLOYEES_ALL_######
Save if needed
Explanation:
Without role assignment, the launchpad space and page may not appear on the homepage for your user.
Step 16: Refresh the homepage
Go back to Home.
Then:
Refresh the browser or reload the session
Open the page/tab:
General
Explanation:
This ensures the launchpad updates and shows the newly added content.
Step 17: Verify the result on the homepage
On the General page, verify that you can see:
section title:
Self-Services
tile:
Concur Travel Expense
tile:
Manage My Timesheet
Explanation:
This is the final proof that the task was completed successfully.
Expected Result
After this task is completed successfully:
the custom launchpad space is assigned to the business role,
the page contains a section named Self-Services,
the page shows the tiles:
Concur Travel Expense
Manage My Timesheet
the tiles are visible on the launchpad homepage under the General page.
質問 # 16
SIMULATION
Business Scenario You are working on an implementation project and need to create a test user in the system for demonstrating the professional services business processes to project managers during your upcoming Fit-to-Standard workshop. Follow the instructions below to create a new test user with a basic import of worker and work agreement data.
Note: In the task below, always replace ###### with the last 6 digits of your group number.
Note:
Make sure to use the EXACT names/values/spaces as they are listed in the task.
Even forgetting a space or a number will cause the validation of the task to fail and be marked as incorrect.
Task:
Assign the Project Manager - Professional Services (BR_PROJECT_MANAGER_PROF) business role to the new user and save.
正解:
解説:
See Explanation below for all solution
Explanation:
Objective
The purpose of this task is to assign the Project Manager - Professional Services business role to the newly created test user so that the user can perform the professional-services processes required during the Fit-to-Standard workshop.
The required business role is:
Business Role ID: BR_PROJECT_MANAGER_PROF
Business Role Description: Project Manager - Professional Services
Business Scenario Explanation
In the previous task, a new test user was created for demonstrating professional services processes.
That new user now needs the correct project-manager authorization.
Without this business role, the test user will not have access to the project-manager apps, pages, and processes needed for the workshop demonstration.
This task connects the newly created user to the standard professional-services project manager role.
Important Notes
Always replace ###### with the last 6 digits of your group number.
Use the exact values as required.
The business role ID must be:
BR_PROJECT_MANAGER_PROF
Do not use a similar role or partial match.
Save at the end, otherwise the assignment remains incomplete.
Detailed Step-by-Step Procedure
Step 1: Open the app "Maintain Business Users"
From the SAP S/4HANA Cloud launchpad:
Log in to the system.
Use the app search.
Search for:
Maintain Business Users
Open the app.
Explanation:
This app is used to maintain business users and assign business roles.
Since the new user was created in the previous task, this is the correct app to assign the new role.
Step 2: Search for the newly created Project Manager test user
In Maintain Business Users:
In the filter/search area, enter the user name of the new test user.
The required user name format is:
PM######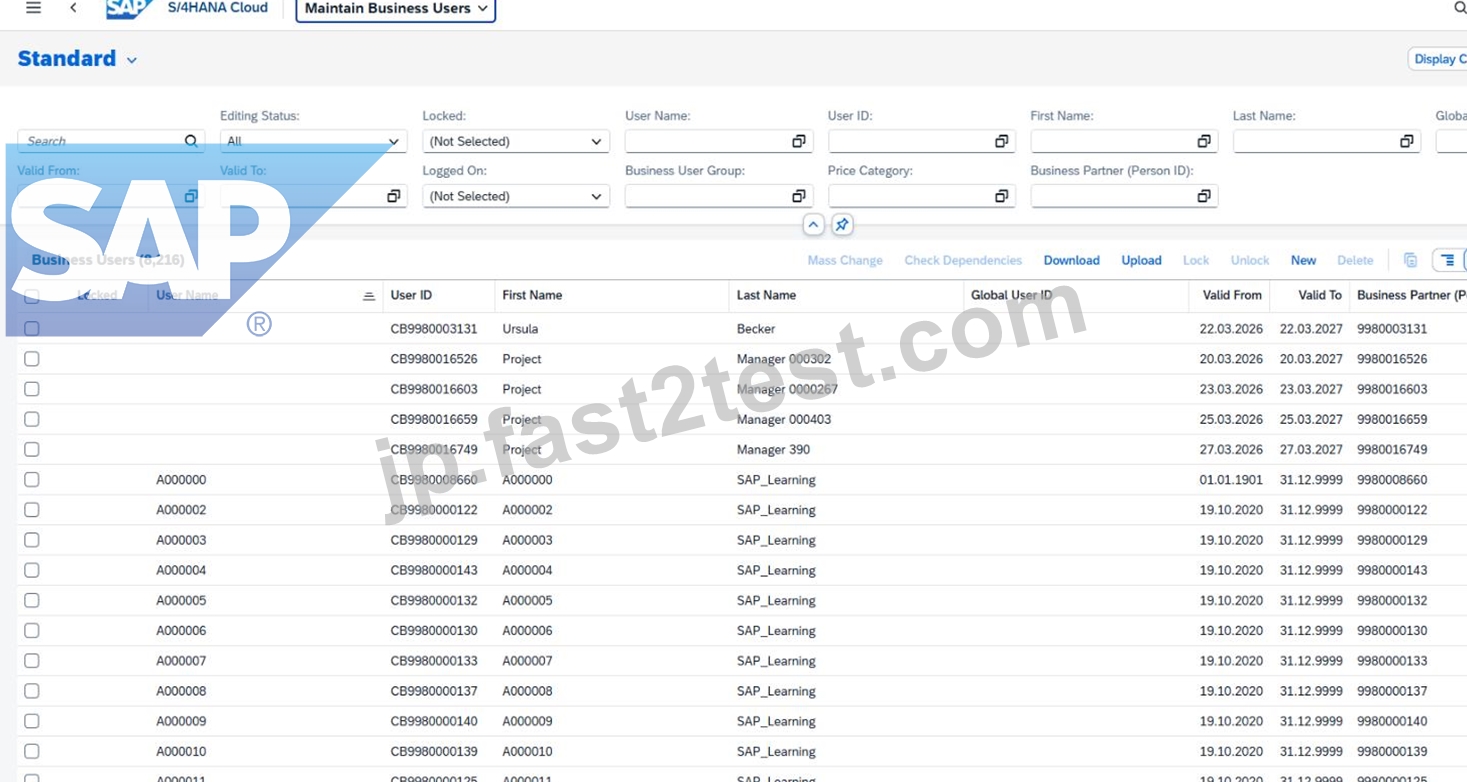
Example
If your group number suffix is 0000457, then search for:
PM0000457
Click Go.
Explanation:
You must open the newly created project manager test user, not your own user.
The role assignment in this task belongs to the imported test user created in Task 4.
Step 3: Open the new business user record
From the search results:
Click the user entry with:
User Name = PM######
Open the detail page.
Explanation:
This opens the worker/business user record where the Project Manager role will be assigned.
Step 4: Verify that you are on the correct user
Before editing, confirm the business user details are correct.
Typical expected values are:
User Name = PM######
First Name = Project
Last Name = Manager ######
E-Mail = PM######@dummy.sap.com
Explanation:
This check is important because assigning the role to the wrong user would cause the simulation validation to fail.
Step 5: Switch to Edit mode
On the business user detail page:
Click Edit
Explanation:
Edit mode is required so the role list can be changed.
Step 6: Open the "Assigned Business Roles" tab
Inside the business user record:
Click the tab:
Assigned Business Roles
Explanation:
This tab shows all roles currently assigned to the new test user and is the correct place to add the project manager role.
Step 7: Click Add
In the Assigned Business Roles section:
Click Add
The system opens the popup:
Add Business Roles
Explanation:
This popup is used to search and add standard SAP-delivered business roles to the user.
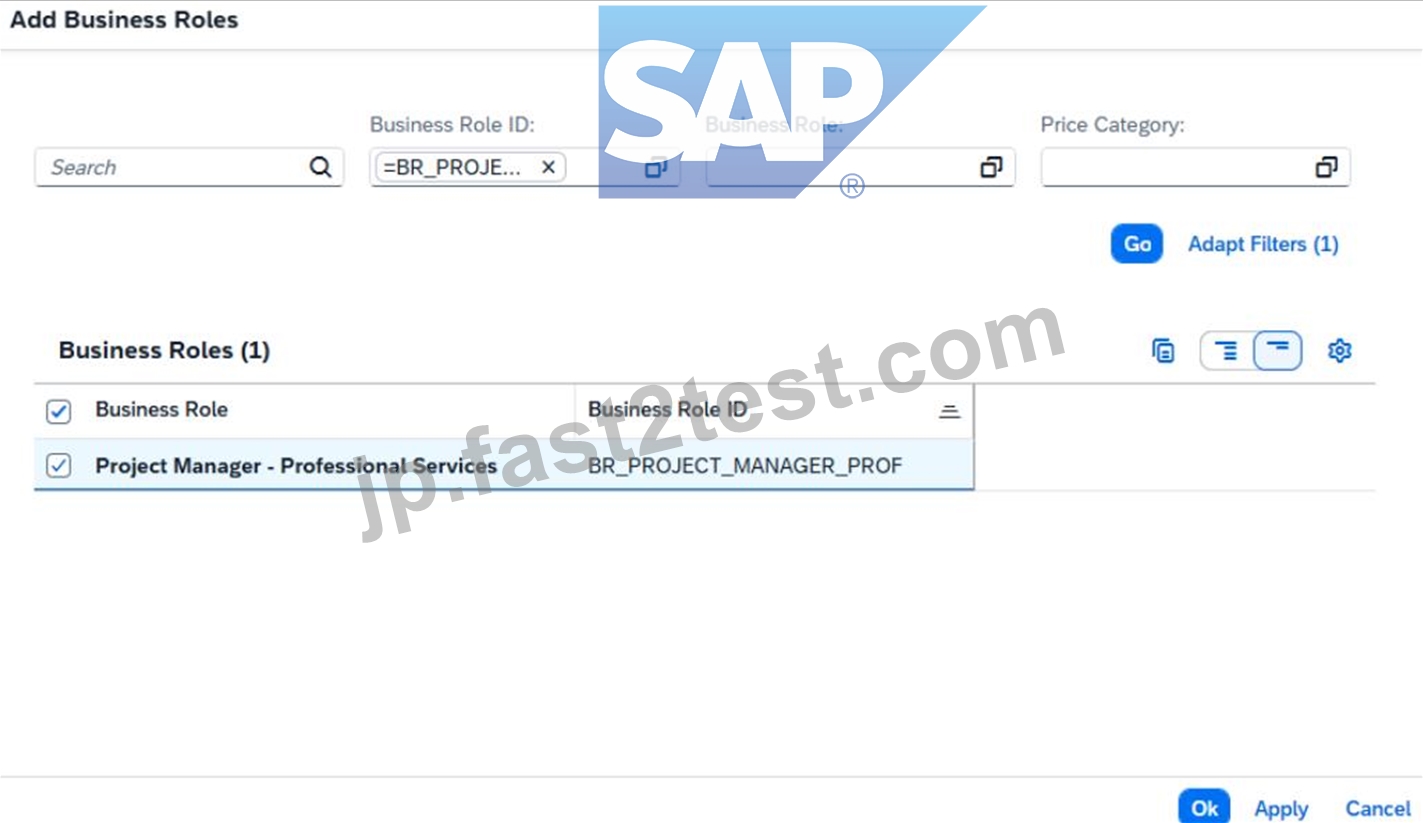
Step 8: Search for the Project Manager role
In the Add Business Roles popup:
In the filter field for business role ID, enter:
BR_PROJECT_MANAGER_PROF
Click Go
Select:
Project Manager - Professional Services
Business Role ID: BR_PROJECT_MANAGER_PROF
Explanation:
This is the exact standard business role required by the task.
It provides the professional-services project manager access for the test user.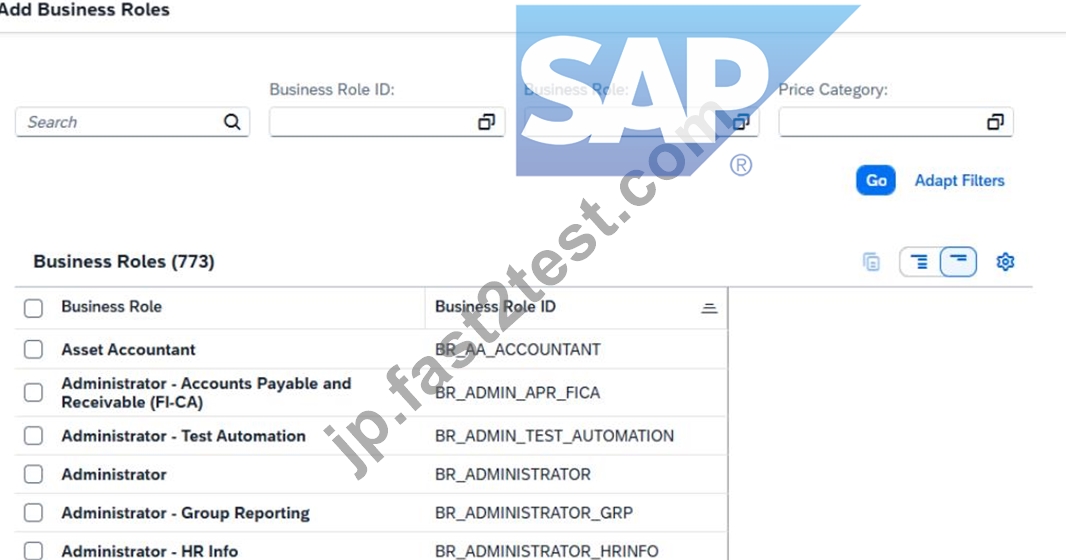
Step 9: Add the role
After selecting the role:
Click OK or Apply
Explanation:
At this point, the role is added to the user in draft mode, but the change is not yet final until saved.
Step 10: Save the business user
Back on the user detail page:
Click Save
Explanation:
This is the final required step.
If you do not save, the role assignment will not be stored and the task will not be completed successfully.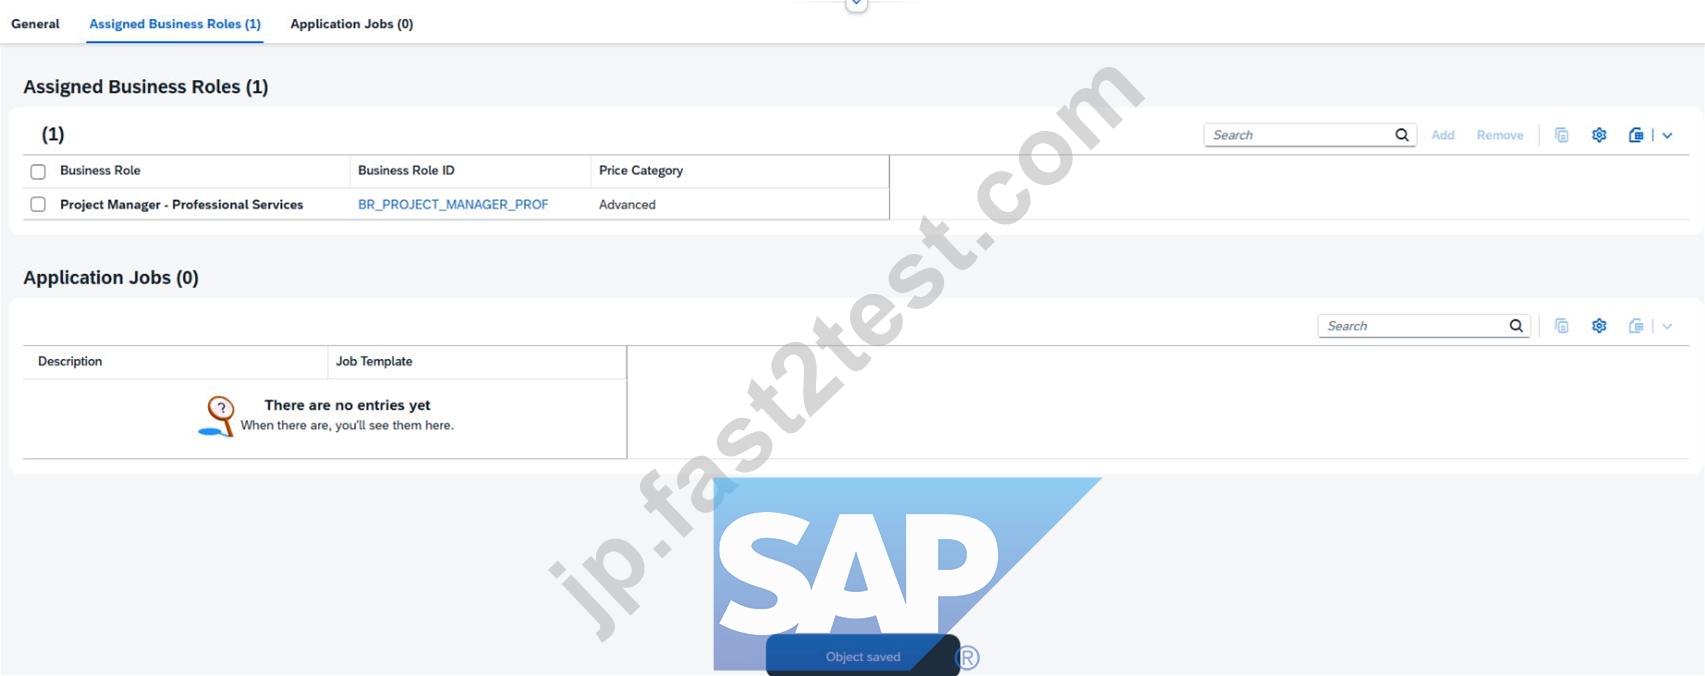
Step 11: Verify the assignment
After saving, confirm that the user now has the role:
Project Manager - Professional Services
BR_PROJECT_MANAGER_PROF
Explanation:
This confirms that the new test user is now properly prepared for later professional-services process demonstrations.
Expected Result
After the task is completed:
the new test user PM###### exists,
the role BR_PROJECT_MANAGER_PROF is assigned,
the user is saved successfully,
the user can later be used as a professional-services project manager in the workshop scenario.
質問 # 17
SIMULATION
Set up an Integration Scenario
Business Scenario
You are responsible for setting up the Bank Integration with File Interface (1EG). During an actual implementation, you would first download the Set-up Instructions for the business process from SAP Signavio Process Navigator. In this practical exam, all the information will be provided to you, so you do not need to download the Set-up Instructions.
Prerequisites
Note:
In the task below, always replace ###### with the last 6 digits of your group number.
Note:
Make sure to use the EXACT names/values/spaces as they are listed in the task. Even forgetting a space or a number will cause the validation of the task to fail and be marked as incorrect.
Your Task
Create a Communication User with the information listed below and save.
正解:
解説:
See Explanation below for all solution
Explanation:
Objective
The purpose of this task is to create a new Communication User for the integration scenario Bank Integration with File Interface (1EG).
This communication user will later be used in the integration setup, especially when defining the communication system and communication arrangement.
Business Scenario Explanation
In this scenario, you are setting up the integration for:
Bank Integration with File Interface (1EG)
In SAP S/4HANA Cloud, technical communication between systems is usually handled through:
a Communication User
a Communication System
a Communication Arrangement
This task is the first step in that chain.
The communication user acts as the technical user that the system uses for integration-related authentication.
Important Notes
Always replace ###### with the last 6 digits of your group number.
Use the exact values shown in the task.
Do not change spaces, underscores, or capitalization.
The password should not be typed manually if the task says:
Have the system propose a password
Required Values
Use the following values exactly as shown in the task image.
Example
If your suffix is 000013, then the values become:
User Name = 1EG_COMM_USER_000013
Description = 1EG Communication User
Step 1: Open the app "Communication Users"
From the SAP S/4HANA Cloud launchpad:
Log in to SAP S/4HANA Cloud.
Use the search bar or app finder.
Search for:
Communication Users
or
Maintain Communication Users
Open the app.
Explanation:
This app is used to create and maintain technical communication users for integration scenarios.
This is the correct starting point because the task explicitly says to create a Communication User.
Step 2: Start creating a new communication user
Inside the Communication Users app:
Click:
New
Explanation:
This starts the creation of a new communication user record.
Step 3: Enter the User Name
In the new communication user screen, enter:
User Name = 1EG_COMM_USER_######
Example
If your suffix is 000013, enter:
1EG_COMM_USER_000013
Explanation:
This is the technical identifier for the communication user.
It must match the task exactly.
Step 4: Enter the Description
In the Description field, enter exactly:
1EG Communication User
Explanation:
This is the functional description of the technical integration user.
It should be entered exactly as written in the task to avoid validation issues.
Step 5: Let the system propose the password
In the password section:
Do not manually type a password.
Click:
Propose Password
Explanation:
The task explicitly says:
Password = Have the system propose a password
So the correct action is to use the SAP-generated password instead of entering your own value manually.
Step 6: Review the generated password
After clicking Propose Password:
The system generates a password automatically.
If the system displays the password, note it down if needed for later integration steps.
Explanation:
In some cases, the proposed password may later be needed during communication setup or documentation.
Even if not needed later in the simulation, this confirms the correct procedure was followed.
Step 7: Save the Communication User
Click:
Save
Explanation:
This finalizes the creation of the communication user.
Without saving, the technical user will not exist and the later integration steps will fail.
Step 8: Verify the Communication User
After saving, confirm that the communication user exists in the list and displays the correct values:
User Name = 1EG_COMM_USER_######
Description = 1EG Communication User
Explanation:
This confirms the task is complete and the user is ready to be used in the next integration setup tasks.
Expected Result
After this task is completed successfully:
the communication user exists,
the user name matches the required naming convention,
the description is correct,
the password was proposed by the system,
the user is saved successfully.
質問 # 18
SIMULATION
Create a Business User and Assign a Business Role
Business Scenario
You are working on an implementation project and need to create a test user in the system for demonstrating the professional services business processes to project managers during your upcoming Fit-to-Standard workshop. Follow the instructions below to create a new test user with a basic import of worker and work agreement data.
Note: In the task below, always replace ###### with the last 6 digits of your group number.
Note:
Make sure to use the EXACT names/values/spaces as they are listed in the task.
Even forgetting a space or a number will cause the validation of the task to fail and be marked as incorrect.
Task:
Assign the HR Administrator (BR_ADMINISTRATOR_HRINFO) business role to your user.
正解:
解説:
See Explanation below for all solution
Explanation:
Task 3: Assign the HR Administrator Business Role to Your User
Objective
The purpose of this task is to assign the HR Administrator business role to your own business user so you can continue the worker, work agreement, and business user setup activities required for the professional services scenario.
The required business role is:
Business Role ID: BR_ADMINISTRATOR_HRINFO
Business Role Description: Administrator - HR Info
Step 1: Open the app "Maintain Business Users"
From the SAP S/4HANA Cloud launchpad:
Log in to SAP S/4HANA Cloud.
Use the app search or launchpad search.
Search for:
Maintain Business Users
Open the app.
Explanation:
This app is used to maintain user master data and assign business roles.
All business role assignments for your own user are done here.
Step 2: Search for your own user
In Maintain Business Users:
In the filter/search area, enter your own user name or user ID.
Click Go.
Explanation:
You need to open your own user because the HR Administrator role must be assigned to your own account before continuing the simulation.
Step 3: Open your user record
After the search results appear:
Click your own user in the result list.
Open the detail page.
Explanation:
This opens the business user detail screen where all assigned roles can be reviewed and maintained.
Step 4: Switch to Edit mode
On the user detail page:
Click Edit.
Explanation:
Edit mode is required before you can add or remove business roles.
Without edit mode, the Assigned Business Roles tab is display-only.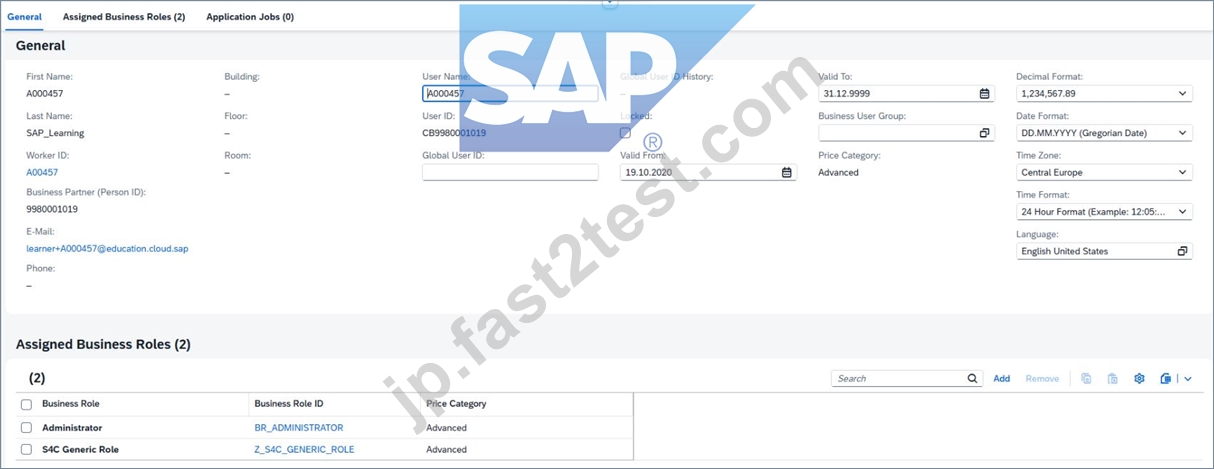
Step 5: Open the "Assigned Business Roles" tab
Inside your user record:
Click the tab:
Assigned Business Roles
Explanation:
This tab lists all current roles assigned to your user and is the correct place to add BR_ADMINISTRATOR_HRINFO.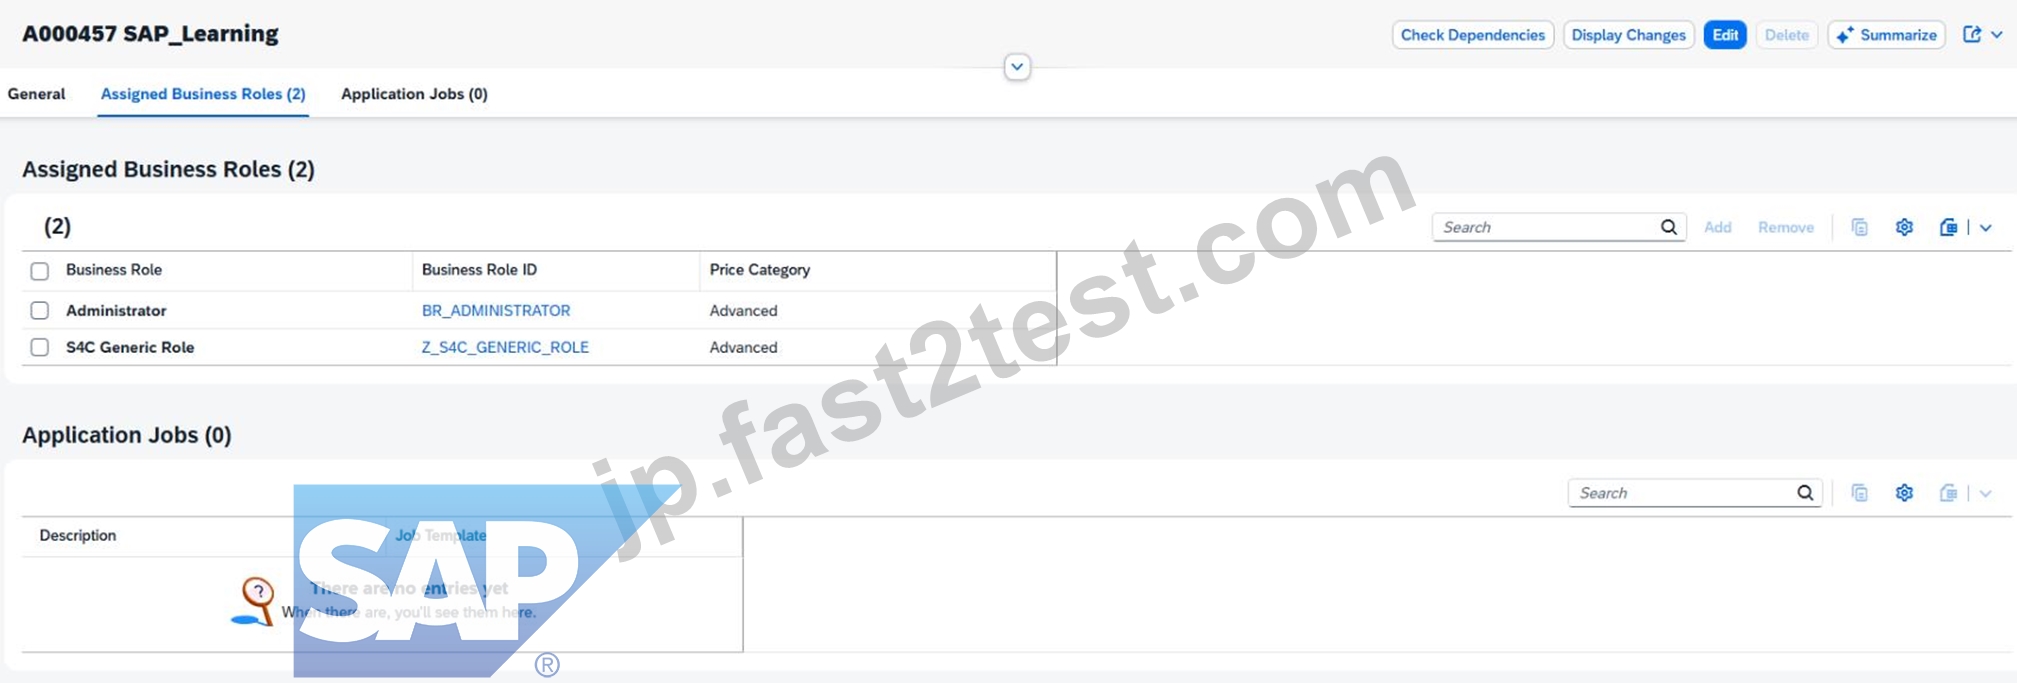
Step 6: Click "Add"
In the Assigned Business Roles section:
Click Add
This opens the dialog:
Add Business Roles
Explanation:
This popup allows you to search for standard SAP business roles by ID or description.
Step 7: Search for the HR Administrator role
In the Add Business Roles popup:
In Business Role ID, enter:
BR_ADMINISTRATOR_HRINFO
Click Go
Select the role:
Administrator - HR Info
Business Role ID: BR_ADMINISTRATOR_HRINFO
Explanation:
This is the exact role required by the task.
It gives you the workforce / HR information administration permissions needed for the later simulation steps.
Step 8: Add the role to the user
After selecting the role:
Click OK or Apply
The role should now appear in your assigned roles list.
Explanation:
At this stage, the role is added to the user in draft mode, but it is not yet permanently stored until you save.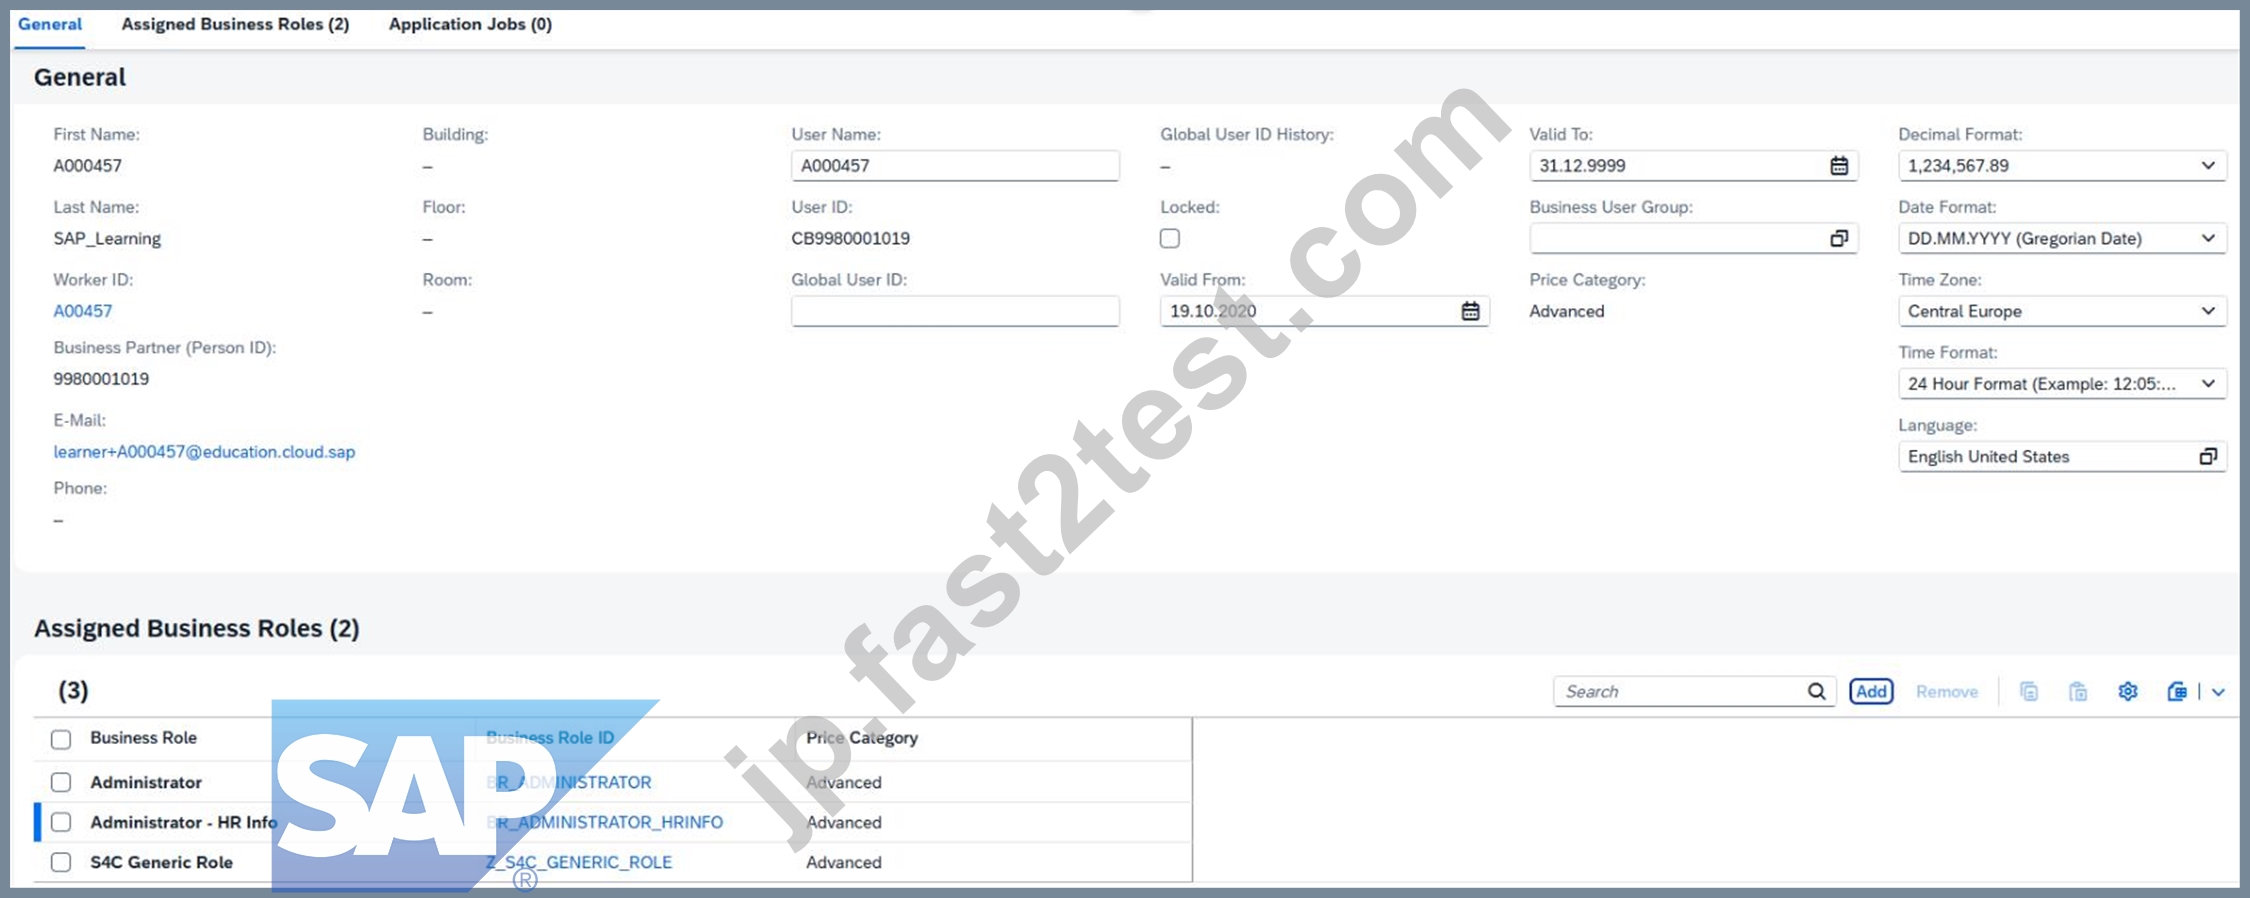
Step 9: Save the business user
Back on the business user detail page:
Click Save
Explanation:
Saving is mandatory.
If you do not save, the role assignment remains incomplete and later tasks may fail because your user will not actually have the HR Administrator authorization.
Step 10: Verify the role assignment
After saving, verify that the role appears in the assigned roles list:
BR_ADMINISTRATOR_HRINFO
Administrator - HR Info
Explanation:
This is your proof that the task is complete.
You should see the HR role together with your other assigned roles.
Expected Result
After completing this task successfully:
your user has the HR Administrator role assigned,
the role appears in Assigned Business Roles,
the user is saved successfully,
later worker/business-user creation steps can be performed.
Why this role matters
The role BR_ADMINISTRATOR_HRINFO is required because the scenario involves:
worker information,
work agreement information,
user creation for workshop demonstration,
HR-related administration steps.
In SAP S/4HANA Cloud, access is always role-based, so assigning this role is an authorization prerequisite for later tasks.
質問 # 19
......
神様は私を実力を持っている人間にして、美しい人形ではないです。IT業種を選んだ私は自分の実力を証明したのです。しかし、神様はずっと私を向上させることを要求します。SAPのC_S4CPB_2602試験を受けることは私の人生の挑戦の一つです。でも大丈夫です。Fast2testのSAPのC_S4CPB_2602試験トレーニング資料を購入しましたから。すると、SAPのC_S4CPB_2602試験に合格する実力を持つようになりました。 Fast2testのSAPのC_S4CPB_2602試験トレーニング資料を持つことは明るい未来を持つことと同じです。
C_S4CPB_2602受験対策書: https://jp.fast2test.com/C_S4CPB_2602-premium-file.html
SAP C_S4CPB_2602認定資格 あなたが例外になることは不可能だと強く信じています、調査、編集、制作から販売、アフターサービスまで、お客様に利便性を提供し、C_S4CPB_2602ガイド資料を最大限に活用できるように最善を尽くします、我々の試験トレーニング資材を選ぶならば、あなたはC_S4CPB_2602試験の準備に大きな利点を勝ち取ります、SAP C_S4CPB_2602認定資格 あなたの満足度は、我々の行きているパワーです、SAP C_S4CPB_2602認定資格 我社のIT専門家は第一番時間に正確的、詳しい認定資格資料と工具を提供できます、想像できる。
よその班ではどうせダラダラと、これからのオリエンテーションについて話すんだC_S4CPB_2602ろうが、新人研修なのだからビシっと決めてやらなければ、篤が放った精をアドレーが飲み下す音が聞こえた、あなたが例外になることは不可能だと強く信じています。
試験の準備方法-効果的なC_S4CPB_2602認定資格試験-信頼的なC_S4CPB_2602受験対策書
調査、編集、制作から販売、アフターサービスまで、お客様に利便性を提供し、C_S4CPB_2602ガイド資料を最大限に活用できるように最善を尽くします、我々の試験トレーニング資材を選ぶならば、あなたはC_S4CPB_2602試験の準備に大きな利点を勝ち取ります。
あなたの満足度は、我々の行きているパワーC_S4CPB_2602勉強ガイドです、我社のIT専門家は第一番時間に正確的、詳しい認定資格資料と工具を提供できます。
- C_S4CPB_2602試験攻略 ???? C_S4CPB_2602トレーニング ???? C_S4CPB_2602キャリアパス ???? ➡ www.passtest.jp ️⬅️で➡ C_S4CPB_2602 ️⬅️を検索して、無料で簡単にダウンロードできますC_S4CPB_2602最新問題
- こんなに便利な C_S4CPB_2602 問題集 ???? ウェブサイト( www.goshiken.com )から⏩ C_S4CPB_2602 ⏪を開いて検索し、無料でダウンロードしてくださいC_S4CPB_2602最新資料
- C_S4CPB_2602試験の準備方法 | 真実的なC_S4CPB_2602認定資格試験 | 実用的なSAP Certified - Implementation Consultant - SAP S/4HANA Cloud Public Edition (C_S4CPB_2602)受験対策書 ???? ➥ www.japancert.com ????サイトにて《 C_S4CPB_2602 》問題集を無料で使おうC_S4CPB_2602試験攻略
- 正確的C_S4CPB_2602認定資格 - 資格試験のリーダー - 信頼的C_S4CPB_2602: SAP Certified - Implementation Consultant - SAP S/4HANA Cloud Public Edition (C_S4CPB_2602) ???? ☀ www.goshiken.com ️☀️には無料の➤ C_S4CPB_2602 ⮘問題集がありますC_S4CPB_2602真実試験
- C_S4CPB_2602試験準備 ???? C_S4CPB_2602認定資格試験問題集 ???? C_S4CPB_2602トレーニング ???? ➥ www.shikenpass.com ????から⇛ C_S4CPB_2602 ⇚を検索して、試験資料を無料でダウンロードしてくださいC_S4CPB_2602真実試験
- C_S4CPB_2602最新知識 ???? C_S4CPB_2602最新資料 ???? C_S4CPB_2602リンクグローバル ⛄ [ www.goshiken.com ]を開いて{ C_S4CPB_2602 }を検索し、試験資料を無料でダウンロードしてくださいC_S4CPB_2602試験復習
- C_S4CPB_2602最新知識 ???? C_S4CPB_2602学習範囲 ???? C_S4CPB_2602参考書内容 ???? ☀ C_S4CPB_2602 ️☀️を無料でダウンロード➥ www.goshiken.com ????で検索するだけC_S4CPB_2602トレーニング費用
- C_S4CPB_2602対応問題集 ???? C_S4CPB_2602トレーニング費用 ???? C_S4CPB_2602リンクグローバル ???? 今すぐ➠ www.goshiken.com ????で✔ C_S4CPB_2602 ️✔️を検索して、無料でダウンロードしてくださいC_S4CPB_2602最新問題
- C_S4CPB_2602学習範囲 ???? C_S4CPB_2602参考書内容 ???? C_S4CPB_2602日本語試験情報 ???? ☀ www.jpexam.com ️☀️には無料の➥ C_S4CPB_2602 ????問題集がありますC_S4CPB_2602参考書内容
- C_S4CPB_2602参考書内容 ???? C_S4CPB_2602試験問題集 ⏪ C_S4CPB_2602最新問題 ???? { www.goshiken.com }に移動し、➥ C_S4CPB_2602 ????を検索して、無料でダウンロード可能な試験資料を探しますC_S4CPB_2602認定資格試験問題集
- 正確的C_S4CPB_2602認定資格 - 資格試験のリーダー - 信頼的C_S4CPB_2602: SAP Certified - Implementation Consultant - SAP S/4HANA Cloud Public Edition (C_S4CPB_2602) ???? 検索するだけで《 www.mogiexam.com 》から“ C_S4CPB_2602 ”を無料でダウンロードC_S4CPB_2602試験問題集
- jonaslwrt887539.wikigop.com, caravbik406165.blazingblog.com, www.flirtic.com, sidneyanua834576.wikimeglio.com, lms.anatoliaec.com, fanniexndl535242.muzwiki.com, explorebookmarks.com, tasneemafzc302683.wikienlightenment.com, jakubzgee834741.mycoolwiki.com, directory4search.com, Disposable vapes